Relighting is a post-production technique that takes a base image and alters the appearance of the lighting sources, or even adds the appearance of new lighting sources altogether, to improve the image.
Sometimes the light in a photograph just isn’t what you want it to be. Maybe you’re working on a stock image, the desired look changes after the shoot, or you need to fit a portrait from one location into the background from another. There are many reasons why a perfectly servicable photograph in one scenario might not work in another. Relighting is often just the trick to save the day.
Last time we looked at relighting and how to add natural-looking effects with Knoll Light Factory. Here we’ll look at six Photoshop actions that add a more dramatic lighting look to your portrait photographs.
Wait, What is an Action?
An action is a file containing instructions for Adobe Photoshop. Running an action performs a series of automated steps on an image. Actions usually have more than one preset within them, designed work together. They also often contain points along the way for user input. Using an action as part of your workflow can be a great addition, and save you time. Although many actions seem like ‘one-click’ solutions, it’s important to still treat the image in the way you usually would and have a plan for it. I like to think of actions as an addition to your workflow, not something to solve all your post-production problems.
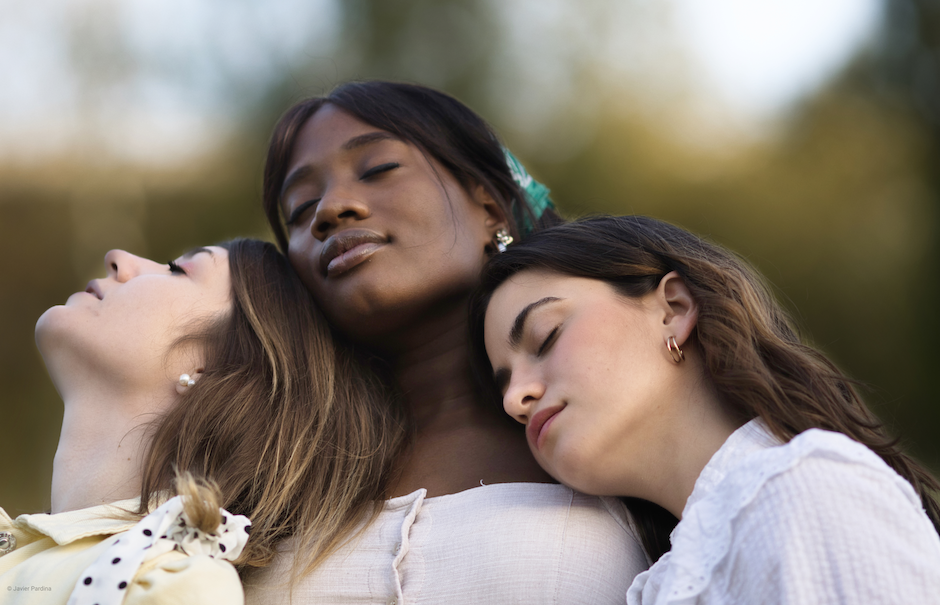
This is the image I’ll be using on all the actions, so that you can see the differences of each accurately:

1. Soft Focus
Applying the Action
Create new layer called ‘brush‘. On this layer, paint over in any colour, the bits of image you’d like to keep in focus. In this case, I want the face and part of the neck to remain sharp.

Run the action.

This is the result after running the action, so obviously some tweaking is needed here.

The menu is broken down into colour and soft focus. Let’s look at tweaking some of the soft focus options to get a better result. Mostly the background blur and bokeh textures are the things obscuring the image, so I’ve scrapped some of the larger bokeh and dipped the opacity on the background blur layer:

In the colour folder, there are a number of options, which in essence really do just change the colour, so it’s a matter of preference. Each of these can then be tweaked again though for finer tuning. There’s also an adjustment mask for brightness, contrast, colour tint and saturation.
The colours are mostly pastels with a couple of nice complimentary colour gradients thrown in. They’re quite heavy handed so chances are you’ll need to pull them back a bit on your image.

Here I’ve dipped the overall saturation for a softer look and although I like the pink tone, I’ve gone for a cooler one to show you the difference to our earlier image.
You can use more than one in conjunction with each other but I wouldn’t recommend using too many, piling lots of textures and fill layers on top of one another will really degrade the look of the image.

Finally, I’ve added some contrast using the layer within the colour folder and some overall sharpening using the layer within the soft focus folder. Remember, you can use the mask on each layer to brush over areas to reduce or increase the effect.
Soft Focus: Before and After

2. Soft Focus 2
Applying the Action
Create new layer called brush and paint over in any colour the parts of the image you want to keep. This time use a soft brush to keep the edges from being hard, or you’ll end up with a rough line when you run the action.

Half way down the image will be the transition point from light to dark, so you may want to avoid colouring the very bottom part of your image in so that it fades to black.

After running the action, you’re left with a number of options grouped together

Soft Focus 2 group is where we’re going to look, and particularly at the reveal normal photo mask.

I think the action has left this a little too dark, so I’m going to use a soft brush with low opacity to just brush back in some of the detail:

Next I want to bring a little detail back into the background by brushing over the ‘background colour’ mask

In the colour folder, as well as adjustments to brightness, contrast and saturation, there are a number of colour options, each of which then break down again so you can really tweak until your heart’s content.

Soft Focus 2: Before and After

3. Soft Focus 3
We’ve had Soft Focus and Soft Focus 2, how could we not have 3?! Once again for this action, make sure your image is RGB Colour and 8 bit.
Create a new layer called ‘brush‘ and paint over your subject; this doesn’t need to be perfect.

Run the action.

The result without any tweaking is quite soft and very orange. Let’s have a look at our options.

Essentially this is broken down into warm and cool casts with an overall contrast layer. The warm 1 option is selected alongside the cool 4 and as always, the folders can be opened again to break down the action into even more parts.
Unlike the previous actions, the folders here are broken up into many more layers inside. Here’s an example of warm 3:

As you can see you really could go on forever with tweaking here and there. I think the best option when faced with so much choice is to choose your base folder and decide what you want from it. So from the example picture right now, it’s too bright, too blurred and there are too many warm tones, so that’s what I want to try and fix.
Have a plan for your image and then address the layers that help you work on that plan. The colour fill layers tend to be the things that have the most impact in these type of actions, so try and find those and dip the opacity accordingly, or paint out over the layer mask.

Above, I’ve dropped the opacity on a lot of the colour fill layers, removed some of the edge glow and blurring effects and brought some definition back to the face. This is still only using ‘Warm 3 ‘ so now I’ll add a ‘cool’ layer and adjust in the same way I did with the warm.
Remember, if you’re using more than one part of the action and they’re designed to do similar things, you may well be repeating things like sharpening and contrast – so it may be best to hide those duplicate layers rather than piling too much on.

Soft Focus 3: Before and After

4. Smokey Scene
Smoky Scene by Hemalaya1 costs $4.
This action requires you to load in some brushes. Place the .ABR file that comes with the action, into the Brushes folder found in the Adobe folder of Program Files if you’re a Windows user, or Applications if you’re on a Mac. Then load your brushes

Create a new layer called ‘object‘ and brush over your subject on that layer.

Run the action.

There are a couple of weird joins on the background which could be down to my selection or an anomaly on one of the action’s layers. It’s easily fixed with a quick clone at the end.
Let’s look at the menu options for this action.

As well as the masks, which make it easy to adjust the effects, each smoke effect is also available in your brushes menu, as you just installed them.

If you want to add more effects, then it’s easy to create a new layer and brush those on, you could even experiment by bringing in different colours that way, too.
Personally I’m not a fan of the yellow fringe, so I’m going to tone that way down in the ‘object in fire’ folder. I’ll also lower the gradient opacity to lessen the orange/red effect on the model and ditch the ‘sparks’.

I found the smoke layers tricky, there are almost too many of them for you to do anything but make an opacity change.
Smoky Scene: Before and After

5. Glam
Glam doesn’t require any pre-brushing but it does have a ‘run setup’ folder as part of the group. Running this will give you the choice of adding a glow, desaturating the image, darkening it or lightening it. Each numbered action also has these as an option (deselected) once you run it.
After that, Glam has 40 presets. That’s far too many to look at here, but we’ll go for one at random, number 20:

The other presets are a variation of this: multi-coloured zazz added to your images! The effect is made up of a number of colour gradient to transparent layers, one on top of another. Each comes with a layer mask so you can brush over the colours to change the effect

As pretty as the colours are, they’re incredibly distracting from our model and so the aim with this image and action is to bring the definition back to the face, while keeping our punchy colours. I’m going to brush over the masks with a soft, low opacity brush to remove some of the bright colours

That’s better, but only one example. Let’s look at another; number 42.

You can see it’s much the same problem again although less on the face this time. The same method applies, brushing with a low opacity soft brush until you get the desired effect.

Glam: Before and After

6. Legendary
As with Sevenstyle’s other actions, make sure your image is RGB Colour, 8 bit and start with a new layer called ‘brush‘.
When you run the action, it will stop part way to ask you to create a light source.

Use the shape tool or pen tool to draw in where you’d like your light source:

When you’re happy, you can go ahead and hit play again on the action and it’ll resume.


Yours may look different depending on the light source that’s been drawn in, but you can see it’s created a ‘ball’ of light from my shape circle at the top left.
Once again there are many options including ten colour changes, amendments to ‘glow’ and ‘dust’, the background texture, essentially, and some overall changes to things like contrast, sharpening etc.
This picture is far too orange coloured for me now so I’m going to tone that right down and make it a little more neutral.

This is colour option nine with the opacity lowered a little. I’ve also reduced the glow, increased sharpness and contrast around the face and toned down the textured background.
You can see the result is a much paler, stylized look to the original, although we’ve kept some of the colour and toning from the background, so it blends much nicer with the model than the previous ‘orange’ look did.
Legendary: Before and After

Conclusion
As I mentioned at the start, I believe actions are something to compliment your editing process, not replace it. They can often be a good place to start, deciding what you want from an image, seeing how the action works and then breaking each layer down until you’ve achieved that.
The actions in this article are for the most part (with the exception of Glam), very flexible—there’s a lot you can do and many outcomes you can achieve by using them. These actions are particularly suited to images of people and in particular studio style portraits. If you’re aiming for a stylised, ‘wow’ look then they’re right on the money. If you’re looking for something for a bit more natural and subtle then you have to be prepared to dive in a little deeper and spend time adjusting each layer and mask to get the right look.
No Responses